
Hello and welcome!
I’m so glad you’ve joined me today and even more excited to be on the Newton’s Nook Designs blog, sharing a super bright and cute spring gnome garden scene that features the most amazing Gnome Garden Stamp Set!
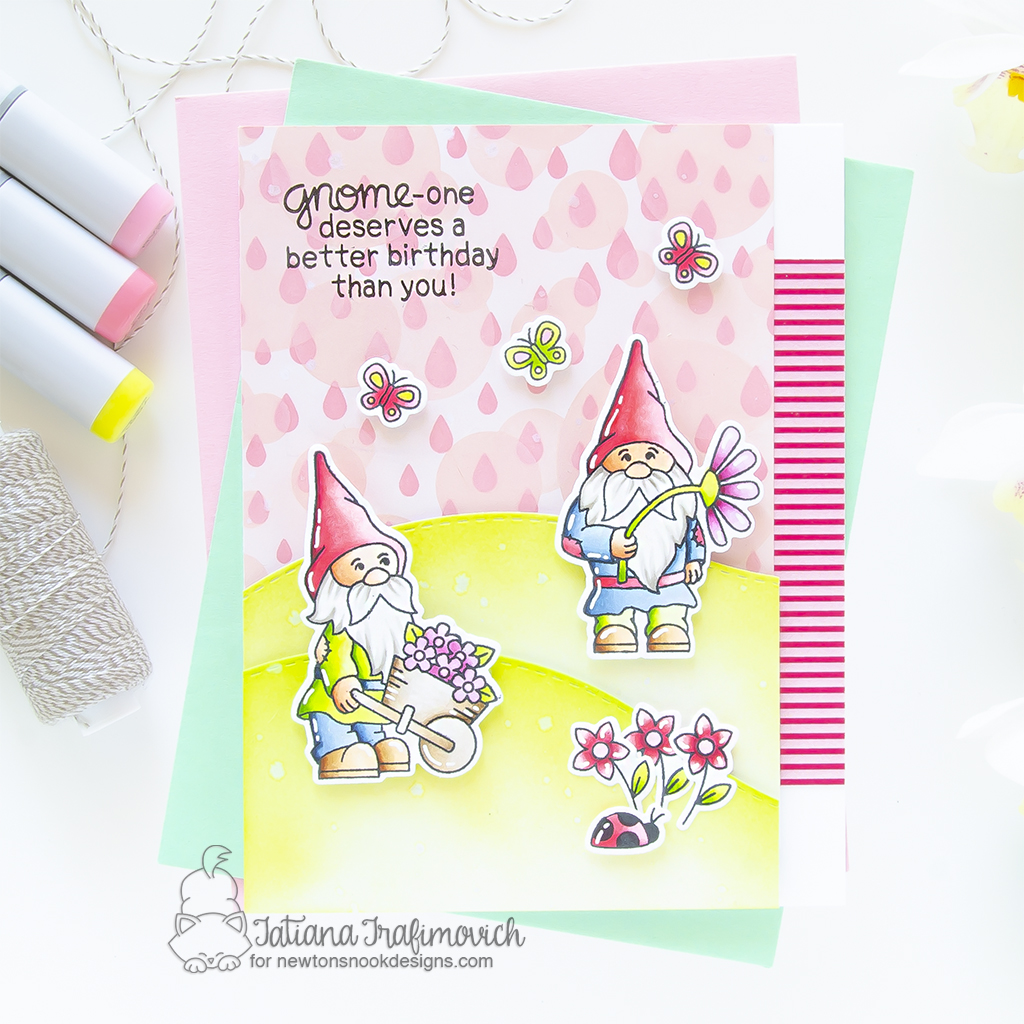
Well, today I created a spring card with bright and bold colors, mixing and matching different cardmaking supplies and techniques! I got a bit creative with the sky portion on my scene choosing a range of pinks instead of usual blues. I applied a couple of different layers through Bokeh Stencil Set and Raindrops Stencil then filled the whole area with the same pink shade, keeping my hand much lighter. Please, continue reading the step-by-step instructions below if you want to recreate this fun card!

Key Ingredients:
- Gnome Garden Stamp Set
- Gnome Garden Die Set
- Bokeh Stencil Set
- Raindrops Stencil
- Land Borders Die Set
- Spring Time Paper Pad
Step By Step Instructions:
- Die cut from Neenah Solar White paper all the elements you need, using the coordinating Gnome Garden Die Set and Sizzix Big Shot Die Cutting machine. Save the negative parts of the dies.
- Stamp the outline illustrations from Gnome Garden Stamp Set with Memento Tuxedo Black ink, using the negative parts of the dies as a guide for a perfect alignment inside the stamping positioning tool.
- Color the stamps with COPIC MARKERS. I used on this card:
- skin E000-E01-E02-E11
- bird W1-W3
- cart E40-E41-E42-E43
- pink RV0000-RV10-RV13-RV15-R39
- pink/ violet RV52-RV55-RV66
- green YG0000-YG00-YG01-YG03-YG17
- blue B0000-B91-B93-B95-B99
- brown E30-E31-E34-E37
- Trim and score an extended A2 size card base (5 1/2″ x 4 1/4″) from Neenah Solar White paper. I used Tim Holtz Maxi Guillotine Trimmer and Mini Score Board.
- Die cut from the same Neenah Solar White paper two hills, using Land Borders Die Set.
- Ink them with Twisted Citron Distress Oxide and Twisted Citron Distress inks, using a blending brush.
- Trim a piece of Neenah Solar White paper for the sky portion.
- Secure the layer #1 from Bokeh Stencil Set with a low tack tape on the sky piece and ink it with Tattered Rose Distress Oxide ink, using again blending brush.
- Repeat the same steps with the layer #2 from Bokeh Stencil Set and add more inked circles.
- Lift up the bokeh stencil and keep inking the sky portion with the same Tattered Rose Distress Oxide ink, keeping your hand much lighter to fill the whole area.
- Then secure the Raindrops Stencil on the pink sky and ink it with Worn Lipstick Distress Oxide ink to add brighter raindrops pattern on top.
- Splatter all the inked elements with some tiny dots of water or pearlescent solution to add a bit of interest.
- Trim a narrow striped piece of paper from Spring Time Paper Pad.
- Stamp the sentiment from Gnome Garden Stamp Set with Memento Tuxedo Black ink.
- Arrange and glue in place all the elements on the card front by popping some of them on a foam tape for a bit of dimension.
- Finish with a few highlights added with a white gel pen.

That’s all for today! Hope you like this cute card ! Thanks so much for stopping by and have a fabulous day!
Hugs,
Tatiana